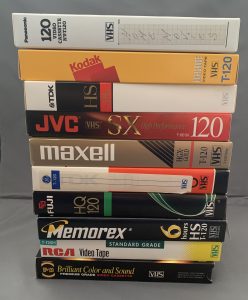
When’s the last time you’ve watched old family home videos? Do you still have a stack of old Hi8 or VHS tapes, orphaned without a device to play them on?
Our family was in this boat, with tapes we hadn’t watched in years (or, in a couple of cases, ever), so I undertook an effort to digitize everything and upload it to a family YouTube channel. Converting everything can seem like a daunting task, but I’m going to walk you through the ins and outs and provide tips to make it as easy as possible. Most of this guide is tailored to converting old analog video, but I’ll also talk about encoding parameters for digitized videos and setting up a private family YouTube channel, which is surprisingly difficult due to Google’s current policies.
Step 1: Capture
As difficult as it may seem when you’re staring at mounds of tapes, getting them into the computer is really just the first step. You have two choices here: do it yourself, or hire it out.
Using a digitizing service
For larger numbers of tapes, hiring it out will be expensive, but will also save you many hours of time. Also, if you have formats like Hi8 or MiniDV but not the camcorders, it’s difficult to find a compatible playback device at all, so sending it out may be your only choice. There are a lot of services out there that do this, we used Southtree years ago for some of my Mom’s tapes.
How does it work? You put your tapes in a pre-paid box they send to you, they convert them and return them to you along with DVDs or a thumb drive with your files. (Download is also offered, but at the same price, so I’d opt for a thumb drive every time.) They provide the box, shipping both ways, and the new storage media. Current cost is $15 a tape, with no volume discounts, and a $30 flat fee for the storage media. Please note, however, that they run promotional pricing all the time: currently, there’s a 25% off sale. For twenty tapes plus storage media, list price is $330, with the sale you’ll actually pay $247.50 (plus tax), so it’s closer to $12 per tape. This may sound like a lot, and it is, but it saves a lot of time, equipment, and setup.
Pros: Easy, saves many hours of time, no need for special equipment, may be the only practical choice for less common formats
Cons: Cost, wait of 6-8 weeks for processing, risk of loss/damage to originals
Do it yourself
Wait, you say! That’s too much! I’m willing to put in the effort to learn new skills and slog through long hours of monotony to achieve the thrill of self-sufficiency! Read on, brave pioneer.
Playback device

First, you need a device that can actually play the tapes, i.e., a VCR if you’re talking about VHS tapes. Put the word out on social media first to see if you can borrow one, people often have old ones sitting unused in the basement. Your second choice is the local Goodwill, other thrift stores, garage sales, and craigslist. They actually sell for quite a bit on eBay, so I wouldn’t go there unless you strike out elsewhere.
Target cost: $0-$20
Capture device
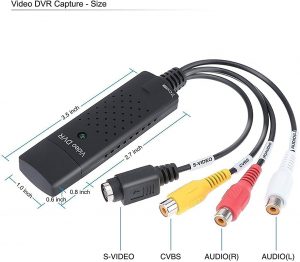
Second, you need a device that can capture the audio and video to get it into your computer. All you need is a very inexpensive, generic USB converter, I paid $14 for this one on Amazon but there are many others that look identical to it. We’ll talk about software below.
Target cost: $15
Connect them together
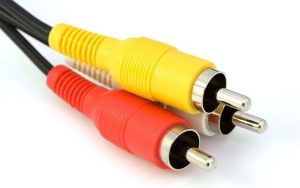
Simply use a composite cable (yellow, red, white) to go from the ‘Line Out’ on the VCR to the coordinating inputs on the capture device. This sends the video (yellow) and audio left and right channels (white, red) from the VCR over to the converter, which plugs into your computer via USB. These cables are usually what connect the VCR to the television, so if you don’t have one of them already in an old box someplace, see if you can get one with the VCR for free. If not, they’re inexpensive at both Amazon and Monoprice.
Target cost: $0
Software
Third, you need the software you’re going to use to capture video. You’re much better off here just using standard software instead of installing a third-rate application from a questionable source; all you’re doing is capturing audio and video from an input, which many programs can do.
Mac
In my case, I used QuickTime Player on my MacBook Pro, and it was very simple. No drivers were needed, the device was just recognized and worked immediately. You simply open QuickTime Player while the converter is attached, select File – New Movie Recording, and then change your source. That part can be tricky if you’re not sure where to look – it’s the arrow right next to the red Record button.
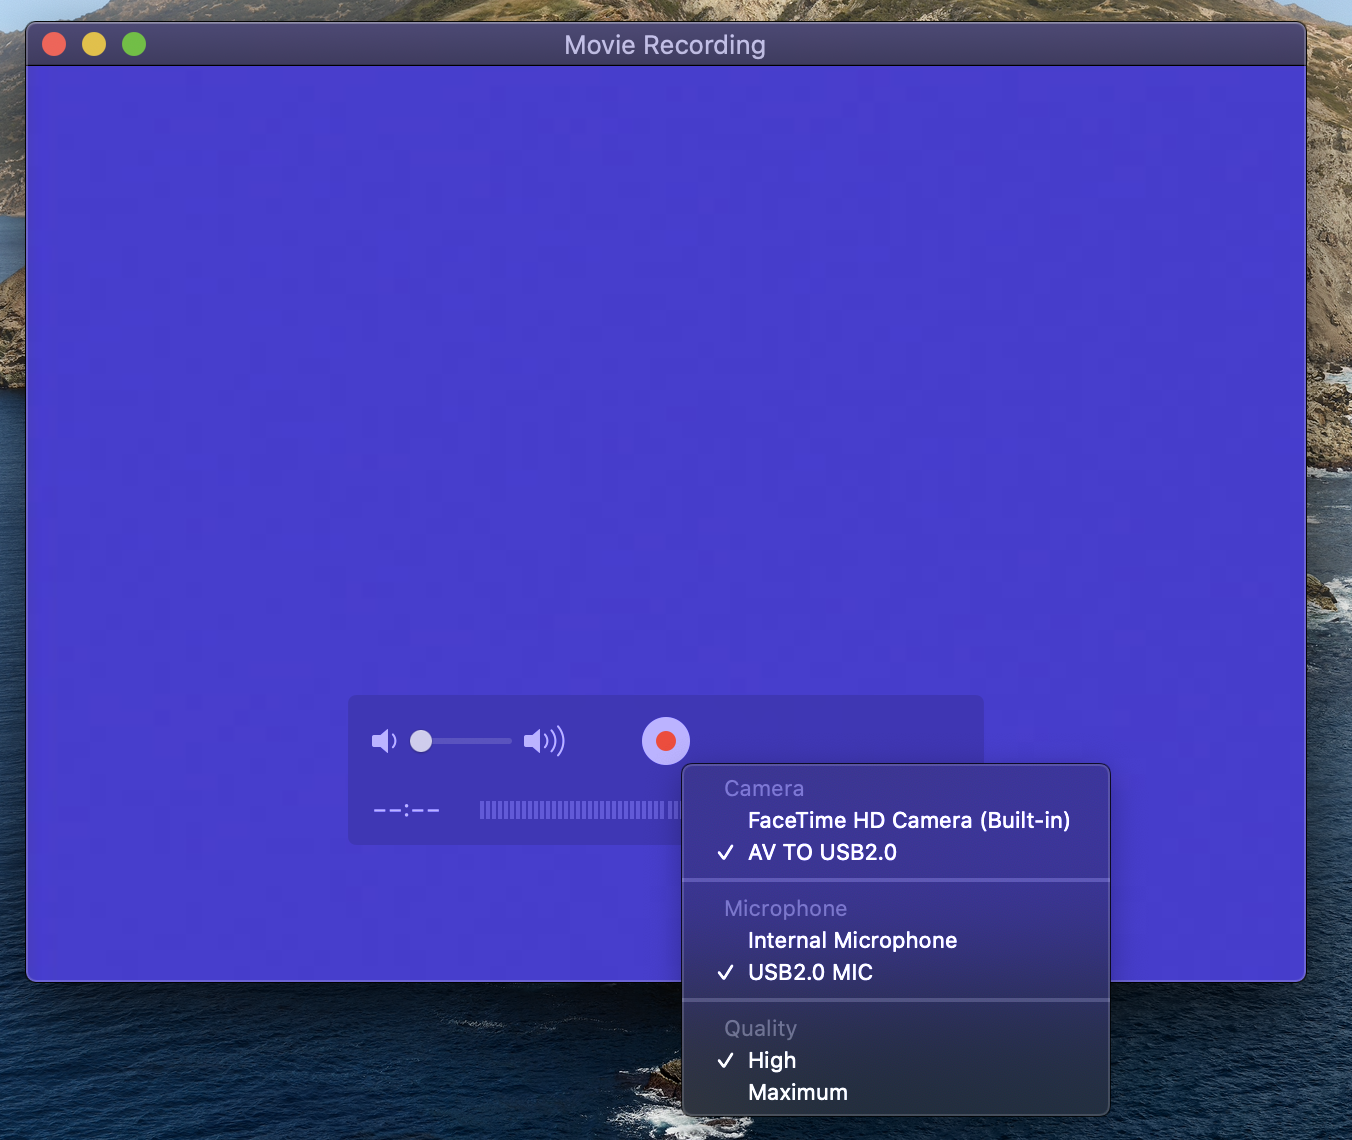
You get an instant live preview screen of the source. Once it’s set up, all you do is hit ‘Play’ on the VCR (make sure the tape is rewound to the beginning), then hit ‘Record’ in QuickTime once playback starts. You let it run until the tape is complete, then stop the recording and save the file. That’s it, very simple. Of course, a four hour tape is going to take an entire four hours to capture, since you’re playing it back live.
PC
I did all of my recording on a Mac, and decided to try my PC for the purposes of this article. I’m glad I did, as I assumed it’d be equally painless, but it wasn’t.
The default drivers on Windows 10 installed as soon as I plugged in the device and worked fine to record audio, but not video. This behavior was the same regardless of what program I used. In the Amazon review comments, many people were able to record just fine with the default drivers on Windows 10, so this problem may be specific to the OS build I’m running.
I attempted to update the drivers, both through Windows and the China-based manufacturer, Digitnow, without success. The manufacturer includes software on a CD-ROM, but I decided to try downloading the drivers from digitnow.us first. The website is awful and I couldn’t even navigate portions of it, it’s basically just a front end to Alibaba, the Chinese wholesaling site. Once I finally did locate the driver download for the grabber identified by the model number “BR116”, it took 20 minutes to download at glacial speeds, is not drivers at all but is instead just the software package on the CD, and it’s a .rar file, which average users won’t be able to open since it requires special software (i.e. 7-zip).
Then I fired up a USB CD drive to check out the CD. The manual is riddled with errors and even makes reference to a Pentium IV (which has been discontinued since 2008, twelve years ago). There’s no driver folder on the disk, and no drivers Windows could locate when manually pointed to it. That’s as far as I was going to proceed with sketchy, poorly documented software. I will definitely update here if I can get it working properly.
The key here is, you shouldn’t have to do any of this. It should just work after plugging it in, and for many Amazon users it has, but in my case, it didn’t. If you’re on a PC and this converter, or another like it, does work for you, I strongly advise against using the included software, unless it’s from a trusted source – you’re much better off using a free, widely used, open-source capture software like OBS Studio. VLC Media Player will also work but is more complicated to record with. Windows 10 even has a built-in screen recording feature called the ‘Xbox Gaming Bar’, keyboard shortcut Windows + G, that should work also.
How long does it take?
Recording time depends on how much is on your tapes, and while it’s a long process, you only have to be in front of your computer for a few minutes per tape.
I worked my way through nineteen of our tapes in two days. Some had four hours of footage, others just 20-30 minutes. Once the tape was ready to play, I’d start a new recording window in QuickTime, press Play on the VCR, hit Record in QuickTime, and let it run, checking in every now and then to see when it ended so I could stop the recording and start the next one. You don’t need to worry about letting it run over, since you can cut out any blank space later when you encode.
Here’s a brief video of the starting process.
So in this case, the cost to convert 19 tapes was just $15 for the converter, a borrowed VCR, and a few minutes in between other tasks starting and stopping each recording and switching tapes, instead of $230 from a conversion service. Monotonous and tedious, but not difficult.
Step 2: Convert
Once you have your videos captured, your next steps will depend on how you captured them. If you got files from a conversion service like Southtree or Legacybox, you can choose to skip this step entirely and jump straight to uploading, Step 3, saving even more time. First, though, a word on quality.
Southtree gives the technical specs of how they encode files to USB or for download: H.264 MP4, 480p, 29.97 fps, VBR 1500-3000 kbps. This is a perfectly acceptable format to upload directly to YouTube, and the final result will probably be fine, unless you have really old or degraded tapes. If so, you may want to pass one through the encoding process to assess the result. Running our own Southtree videos through additional encoding took out a noticeable amount of horizontal jitter. Why wouldn’t the company do that themselves? Simple: speed. Turning on additional filtering can improve quality but can also increase encoding times by hours per video, so the services take the quickest path to get a decent result.
If you captured the video yourself, or decided to get your files on DVDs that can be played back on your DVD player, you’ll definitely want to encode your files. It’s not strictly necessary, but they’re huge before encoding, and would take forever to upload as well as a lot of hard drive space to store locally.
Once again, this step is not overly difficult, but it is time consuming. One big advantage of doing it yourself is the ability to turn on those additional filters that can improve your video and audio quality.
Software
My preferred software here is Handbrake, it’s fantastic. It’s free, works on any system, and has a lot of powerful options. Handbrake is a video encoder but not a video editor, which means it can’t trim and splice together specific clips. For that, you’d have to turn to iMovie on Mac, or an editor like VSDC (free) for Windows. However, a special hack is that it CAN easily trim off the beginning or end of a video, which may be all you need in many or all cases, and I’ll explain how.
Initial setup
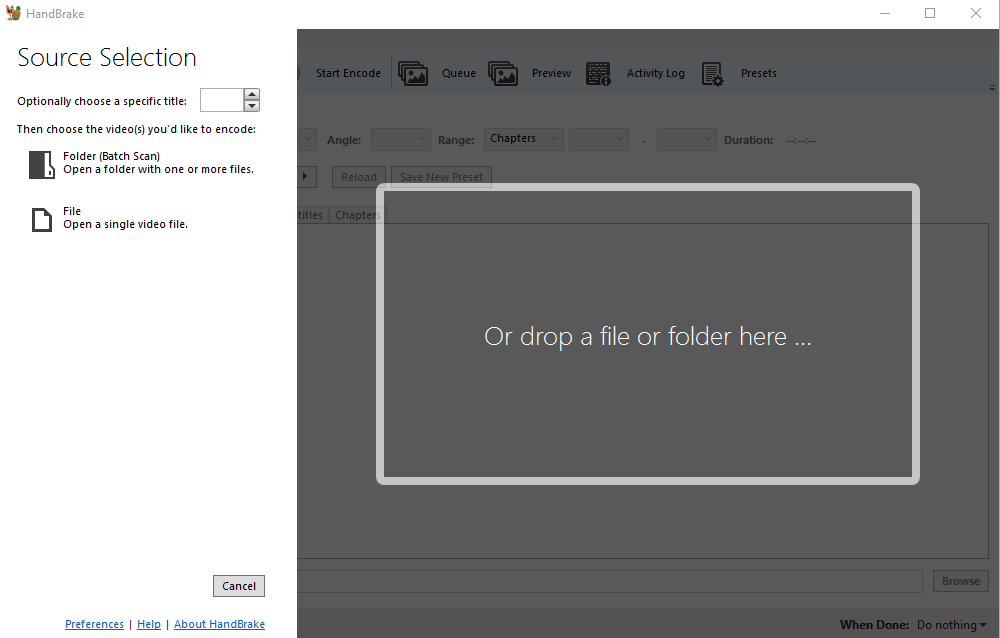
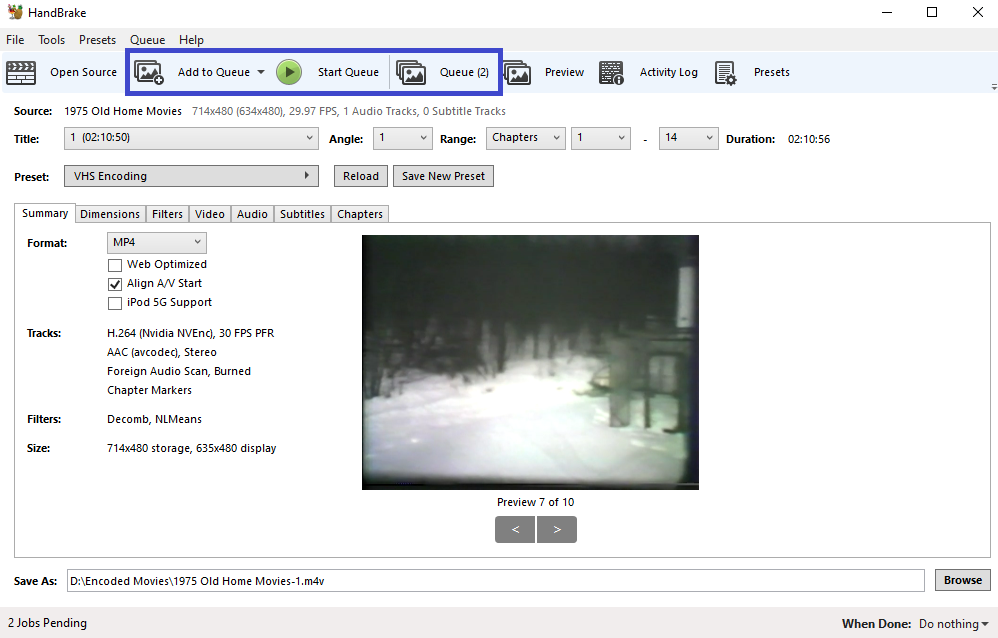
When you first start Handbrake, you’ll see this screen. Drag in the video file that you want to edit. Also note that Handbrake can open your DVD drive as a source if you have a non-copy protected disk in it, like a home movie.
Once you’ve got your file open, the first thing you’ll want to do is specify a range to trim any excess off the captured video, like if you have extra black space at the end. To do this, look next to Range, and change the drop down from its default “Chapters” to “Seconds”. This allows you to select just a portion of the running time to encode, which means Handbrake can trim from both the beginning and/or the end of your video for the new output file.
For example, if you have a 5 second blank screen at the beginning of your recording when the VCR was starting, and an extra 20 minutes at the end of your video before you realized the tape was over and you stopped the recording, you just set the start time for 00:00:05 and subtract 20 minutes from the end time. Handbrake will then only encode for the range that you selected, and your final video file won’t have the bits you don’t want.
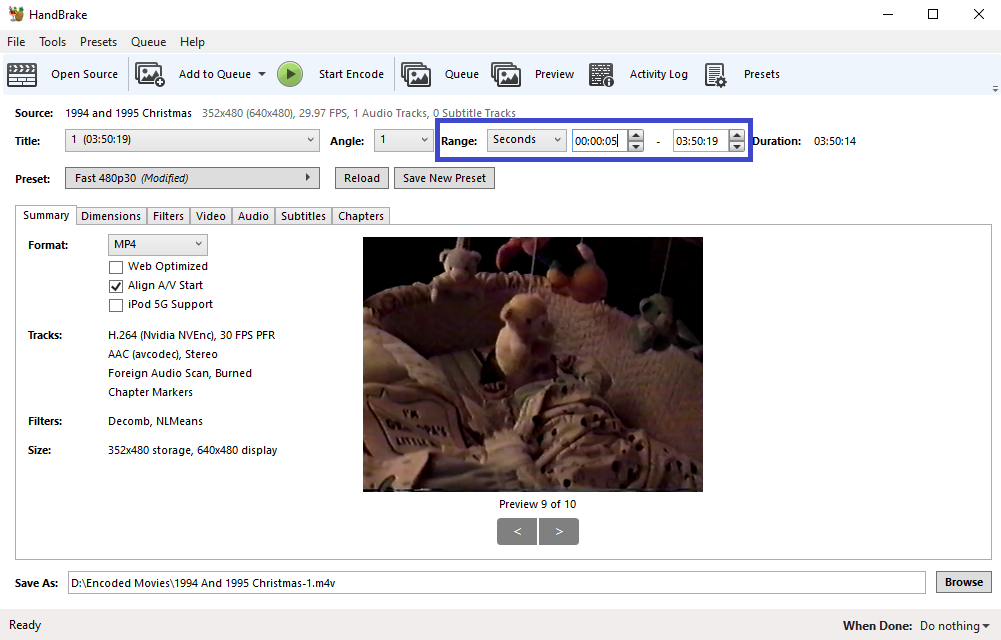
Next, we’ll set up the video encoding parameters and filters, specific to VHS sources. This can look overwhelming but don’t be intimidated. Handbrake has a vast array of options, but we’re only going to change a few of them, and once you’ve set it up once, you can convert over and over with the same settings at the push of a button.
- Where it says Preset, go to General and select the Fast 480p30 preset
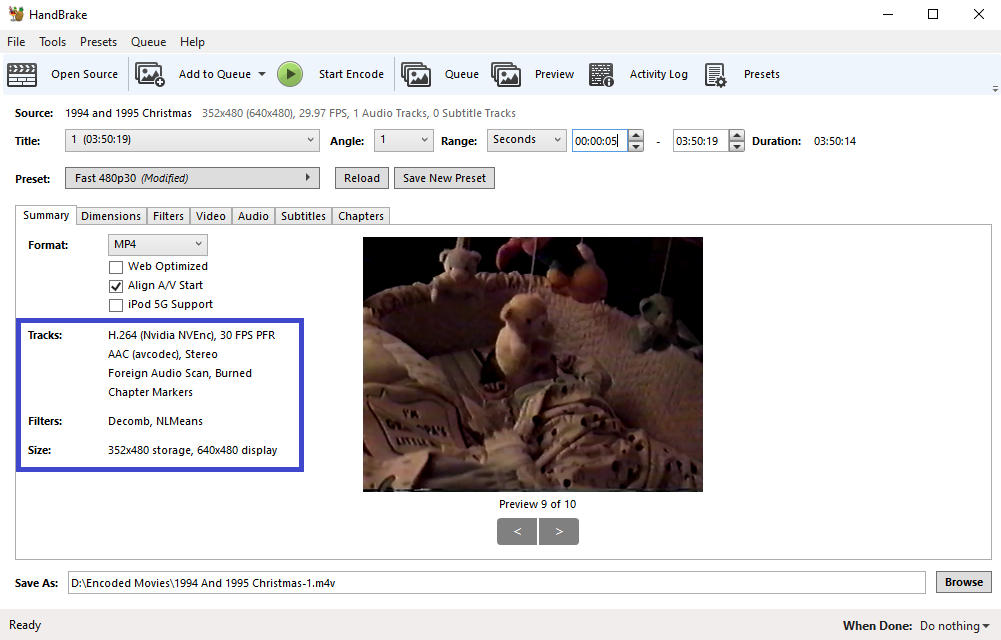
- Under the Filters tab, change Denoise from Off to NLMeans, adjust its own preset to Light, and leave the Tune at None (setting Tune to Tape seems intuitive, but will greatly slow down your encoding)
- Under Video:
- Change the Constant Quality to 24 (this reduces file size dramatically vs. 20, without much quality difference for VHS sources)
- If you have a dedicated graphics card (e.g. for games), you can use a special accelerated codec under Video Codec, such as H.264 (Nvidia NVEnc). It uses your video card to help encode, and will be much faster. If not, just leave this set to H.264 (x264).
- Under Audio, you don’t need to touch anything unless your sound is very low on the output file. If it is, click the dropdown arrow at the end of the audio track line to open the advanced screen, and you’ll see a Gain setting. Higher numbers translate to increased volume on the output video, you’ll need to experiment to find the right value. Try 5 first on a short video, and keep incrementing as needed to increase the volume in the output file (20 is the maximum).
- This is the only setting you might need to adjust tape by tape, I don’t suggest using it unless you have to. If you have more than one video to do, get acquainted with the Preview option in Handbrake, it’ll be much faster to tweak your parameters.
- Under Save As, select the directory or make note of where the file will be saved.
Go back to the Summary tab, and verify that things look correct. Then hit Save New Preset and give it a name (e.g. VHS Encoding), it will now be stored for all future use under Custom Presets.
Encoding
Now the fun begins. If you’ve walked through all of the steps above, you can now press Start Encode and watch the magic happen. Handbrake gives you a nice readout of the instantaneous and average processing rate in frames per second, as well as an estimated time to complete.
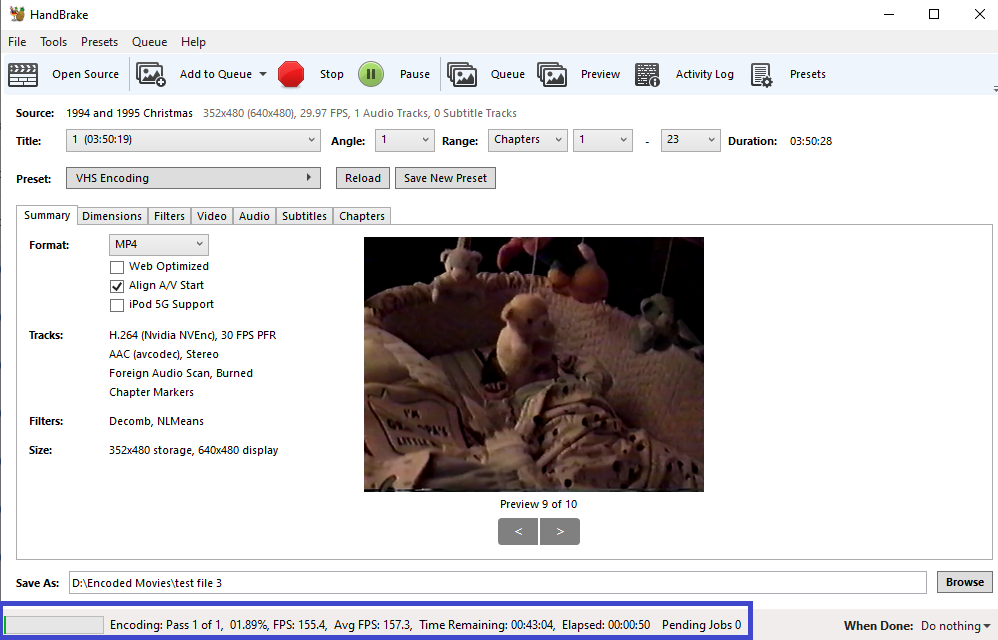
Video is generally 30 frames per second, so if your system is running at 30 fps, you’re encoding in “real time”; that is, a 2 hour video will take 2 hours to process, a 4 hour video will take 4 hours. Just make a note of the completion time, go about your day, and check on it later.
What’s a “good” speed? That’s a difficult question to answer. Faster computers, especially those with more processing cores in the CPU, will be able to run faster than real time. Also, gaming video cards will be able to process more quickly using the optimized encoders in Handbrake.
On my system (a budget gaming computer, Ryzen 2200G with a GTX 1060), I was getting 120-160 fps using video card acceleration. At that rate, I could get through a 4 hour video in less than an hour, which was great. Using only the CPU I got 70-100 fps, so about twice as long, but still a lot better than real time. So, if possible, you’ll want to use the most modern computer in the house to do this task, or budget a lot of time to get through it. This is another thing you’re paying for when you send videos away to get converted – the labor to set this up, and the computer time and power to crunch through it.
Queuing Multiple Videos
If you have more than one or two videos to process, you’ll definitely want to use Handbrake’s Queue. It’s very simple to set up, and frees up a lot of your time.
Set up your video, as before. When you’d normally hit Start Encode, instead press Add to Queue. This will change the user interface and it will now show there’s one video in the Queue waiting to be processed, and the Start Encode button is replaced by a Start Queue button.
You can then open another file, check the preset and Save As location and file name, again hit Add to Queue, and repeat until you have a good batch ready to go. When you’re ready, simply hit Start Queue, and Handbrake will process them all one after the other. This makes it a lot simpler to do large numbers of files and eliminates any downtime.
After you encode all your files, you’ll need a way to share them with friends and family. This is where YouTube comes in – but with a few surprising limitations.
Step 3: Upload and View
So now that you’ve captured and converted all of your videos, or have a thumb drive full of them from your conversion service, you’re ready to upload them for online viewing. Unsurprisingly, the king of online video sharing, YouTube, is your best choice. Once you verify your account, you can upload individual videos up to 12 hours long (or 128GB), and there’s no limit to how many videos you can upload. Contrast this to a competitor like Vimeo, whose free version allows just 5 GB of storage, total. You’d have to pay $240 a year to get anything close to what YouTube offers you for free (ad-supported, of course).
If you’re just going to upload a video or two, you could just use your personal YouTube account to host those. In our case, we had about 60 videos to upload by three different people. So, creating a brand account is perfect for this. It’s separate from your main YouTube account, and allows multiple people to participate as managers and upload their videos to the same account. Create your account, then go into Manage Permissions and grant Manager rights to anyone else you’d like. When you need to upload, simply go to studio.youtube.com, click on your account logo in the upper right, and select Switch Account to select the brand account.
Permissions: More complicated than it should be
The next question is, what settings to use for uploading? And this is where things get a little tricky and unnecessarily complicated for personal videos on YouTube.
Currently, there is no way to have a private YouTube channel in what would be considered the traditional way: where only your family has access to it, can subscribe, get automatic notifications for new videos, and see all of your videos on your channel in the usual interface. There are a lot of questions in Google support on this, and every answer is just a variation of a workaround, because there isn’t a way. It’s a bad decision on Google’s part, because even if these sorts of personal channels with very few viewers aren’t lucrative for them, they could still choose to run ads or otherwise monetize them to at least give you the option.
What you can do is a choice of two options:
- Leave all of your personal childhood videos public, which means anyone can view them or search for them. Not a good choice in my opinion, but this does allow a normal experience where all your videos show up in your channel, and all your family has to do is subscribe. They can also easily share and embed them to social media.
- Upload videos to your channel, make them unlisted or private, and send individual links out to your family for each of them. Much more work for both the uploader and viewers, but videos aren’t public. Users won’t see any videos if they visit your channel page, even if they have the video links, it’ll just be blank.
To keep our videos private, we opted for choice two. Other than the difficulty of the manager having to send a link for every video, viewers also have to save them to find them again, since they won’t show up in your channel. The easiest mechanism here is to open every one of them, then hit Save – Watch Later, so they’re all stored in that user’s account under History.
Visibility: Unlisted versus Private
Google provides a support page that defines the differences between unlisted and private videos, and gives a table with more details.
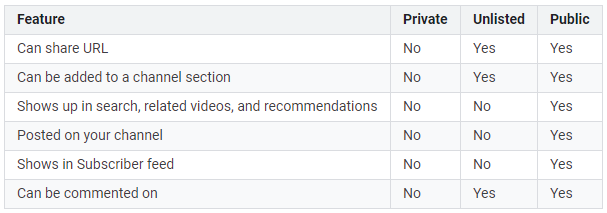
There are a couple of provisos that Google leaves out of this chart. If someone you’ve shared an unlisted video with adds it to a playlist, and that playlist is public, your video will then be exposed in YouTube’s search results. There’s no way to restrict a video from being added to a playlist, so this will always be a worry. Also, anyone can view an unlisted video, but you must have a Google account to view Private videos.
Another major difference is that unlisted videos seem to be held to a higher review standard. One of our unlisted videos was flagged and removed just seven days after upload, with only a handful of views on it. I don’t actually know why, I appealed and asked for more clarity, but Google just sends a form letter of denial (and YouTube has no official customer service for channels that aren’t monetized). My supposition is it shows a baby’s diaper being changed at one point, which YouTube probably classifies as nudity. In the original removal email under Video Content Restrictions, YouTube expressly state “consider making videos private”, and of the others we have that are now private, none have been removed.
Hopefully these details allow you to make an informed choice about how you want to publish your material. For ours, I made about eight of the videos private, and kept the rest unlisted, which is how I originally uploaded them all. If I did it again, I’d just make all of them private to be absolutely sure they couldn’t be viewed outside of our family.
The uploading process
YouTube has a short guide to walk you through the steps. In addition to the basics like giving it a title, description, and picking a thumbnail to display, you’ll need to explicitly state if your video is made for children or not (for most the default will be No, Yes is for channels that do kid’s shows and such), and of course the visibility settings we discussed above.
Setting access for Private videos
It can be surprisingly difficult to locate where to enter the email addresses for access if you don’t know where to look. User run support forums are full of questions on this topic. It is not located in your video dashboard; rather, you must open the video details and click on the Options menu next to Save.
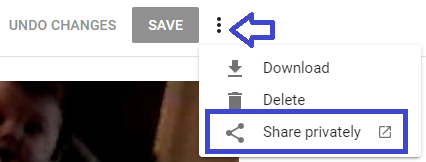
Clicking on ‘Share privately’ will open a new tab and allow you to add viewers by email address, and notify them by email. Only the users in this list will be able to view the video.
Upload in batches before going to sleep
It’s likely you’re going to have some large files to upload, and for many people, your broadband upload speeds at home are just a fraction of your download speeds, so it’s going to take a while. YouTube allows you to upload more than one video at a time, so I suggest doing several at once then walking away, or queuing up a large number of them before bed and letting it run overnight. It could take several hours to upload just a few long videos, better to do it when it won’t disrupt your daily routine or other internet users in the house. In addition, once the videos are actually uploaded, YouTube has to do processing on their end before they go live. For standard definition content like old VHS tapes, this can be pretty quick, 10-20 minutes. For high definition 1080p, it takes longer. For 4k video, it takes a ridiculously long time, like four hours for a one hour video. This is another argument in favor of uploading overnight, so all of the processing can take place while you’re sleeping.
Viewing
Once your videos are uploaded and processed, and your permissions are set, just click on the View on YouTube icon to watch it in your browser. Obviously watching on TV is easy with the YouTube app on pretty much every smart TV, Roku, Fire Stick, and Apple TV device out there. Remember, though, going to your channel won’t help you, because all of your videos are hidden from that interface. Instead, by saving each of them in Watch Later and navigating there in History, you’ll find all of your videos there to play back. It’s a bit clunky, but even my mom is used to it now.
Conclusion: The work is worth it
I learned a lot going through this process. One, I was pleasantly surprised how much Handbrake could improve the quality on some of our old transfers. Two, I have a newfound respect for the converting services. While I didn’t mind doing most the work myself since a lot of it was five minutes of set up and an hour of doing something else, considering how labor intensive the whole process is and the amount of time it will save you, the prices really aren’t that bad.
Third, I’ve been pleasantly surprised how much the family has enjoyed our videos. We’ve had these sitting around for years, either on tapes or DVDs, and nobody ever watched them. Now that they’re on our computers and televisions, our whole family has been enthusiastically watching them, laughing at our old videos and reminiscing about the past. The reaction has been better than I anticipated. In fact, we had a tape of my brother’s wedding fifteen years ago, and it turns out he and his wife had never seen it. They lost their copy in a house move before they’d ever viewed it, and didn’t realize we had one. They got to watch it together for the first time and listen to her late father narrating their wedding day. Memories like that are worth the effort.