If a carport is good enough for Frank Lloyd Wright, it’s good enough for me.
Actually, I started looking into car storage solutions when I knew I’d be spending at least part of the winter here in NY. I thought it’d be interesting to walk through the options and give an overview with costs of the structure I built with my dad over the course of a couple months.
Initially I was looking for storage for just my car, but that left one of my Dad’s vehicles out in the snow, so we shifted our thinking. I’ll provide examples below for both single bay and a bigger option.
Requirement: It needs to be strong
![]()
Syracuse, NY is one of the snowiest cities in the United States; in fact, it’s #5 of the snowiest cities in the world. The area my parents live is actually twenty miles north of the city on what’s called the Tug Hill Plateau, which, due to the jetstream and Lake Ontario, gets 60% more snow on average than Syracuse. If the population was large enough to make the previous list, it’d be #2 in the world.
Yeah. It’s a lot. In the February 2007 storm that got declared a state disaster, my sister’s house got about 9 feet of snow in a week. We all took turns shoveling the roof (yes, that’s a thing) to prevent collapse. Neighbors all over were doing the same thing. So whatever solution you use in this area has to be able to take a substantial amount of weight.
Options
Portable Garages / Canvas Shelters
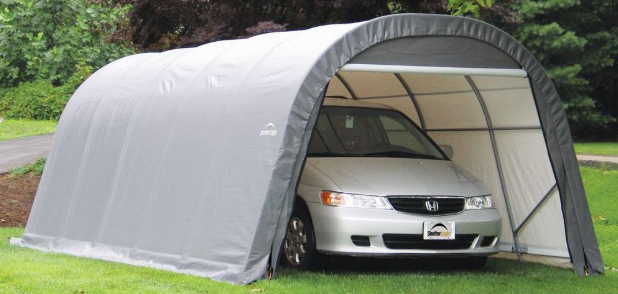
You actually see a fair number of these steel frame, tarp-like covered shelters in the area. They’re relatively inexpensive and don’t count as a “structure” that would require a permit or increase property taxes. You can also drive around after a heavy storm and see collapsed snowpiles, with tube steel sticking out like skeleton bones. In fact, a lot of the negative reviews on homedepot.com are from people with handles like “upstateNYer” that are complaining about breakage after one season. Other downsides: they can be difficult to assemble, the covers wear out and need to be replaced, needs to be firmly anchored against wind shear, no floor. The stronger ones will hold up with care, my sister has had one for about 10 years now, and our neighbor down the street for longer than that.
I decided against this approach because it seemed like too much money for something that was going to wear out, especially when we had the means to put in something more permanent.
Cost: $600, 12’x20′ “snow rated” 40psf. 15’x28′ snow rated jumps to $1800. (28′ probably isn’t long enough for two cars unless quite compact, but options above that are very limited)
Metal Carports

The next step up from the portables is the metal carport. Many of these are manufactured by Carolina Carports and are sold by other distributors who schedule delivery and installation. These are nice in that they’re much more durable than canvas, sturdier, and can be bought with install included. However, based on the reviews, you might be waiting several months or more to get the building. Most are sold without a door to avoid qualifying as a “garage” that would impact the property taxes, but you can get enclosed sides, back, and the front gable as shown above.
The cost is what put me off of this option, as well as the look, it wouldn’t have blended well with the house. We also had the time on our hands to do it ourselves on our own schedule.
Cost: $2775, 12’x21’x6′, both sides and one gable closed, with upgraded snow load to 65psf. Two car 20’x21’x6′ with the same configuration is $3455.
Prefabricated Garages

This category is the one that I was most interested in. Suppliers vary all over the country; in New England, there are a lot of Amish builders that supply prefabricated garages of all sizes to the NY/NJ/PA areas. You get plenty of detail on the construction materials and can modify anything you like since they’re all built to order. Unlike the kits you’d order at Home Depot, these come fully assembled (or the crew finishes it onsite in less than a day for the larger garages) with garage doors, side entry doors, and windows included in the base price. You can even get two story garages to use the upstairs for storage, a bonus room, or a guest suite. Not only do these look and function better than the carports, they add long term value to your home.
I was really interested in pursuing this option, but the tax impact discouraged me. I didn’t want to make a material improvement to the property that would have triggered permits or increased my parents’ tax bills. I do think it’s a great option for many homeowners that may have only considered stick-built instead of modular.
Cost: $3140, 12’x20’x7′, includes floor, 9’x7′ steel garage door with diamond plate guard, 36″ side entry door, two windows 18″x27″. Rafters are 2x4s, 16″ on center, roof is 1/2″ sheeting, tar paper and architectural shingles. A two car 20’x20’x7′ is $6025, but it’s only $900 more for a much roomier 20’x24′.
Our Choice: Stick-built Carport
Revision 1: Single Bay, 10 feet wide, 22 feet long
Since we had the time and skills, wanted to save money, and didn’t want to increase the property taxes, I convinced my dad it’d be a good idea to build a simple carport. What I should actually say is an additional carport, since he already built one several years ago that’s used to store the pontoon boat for the winter.
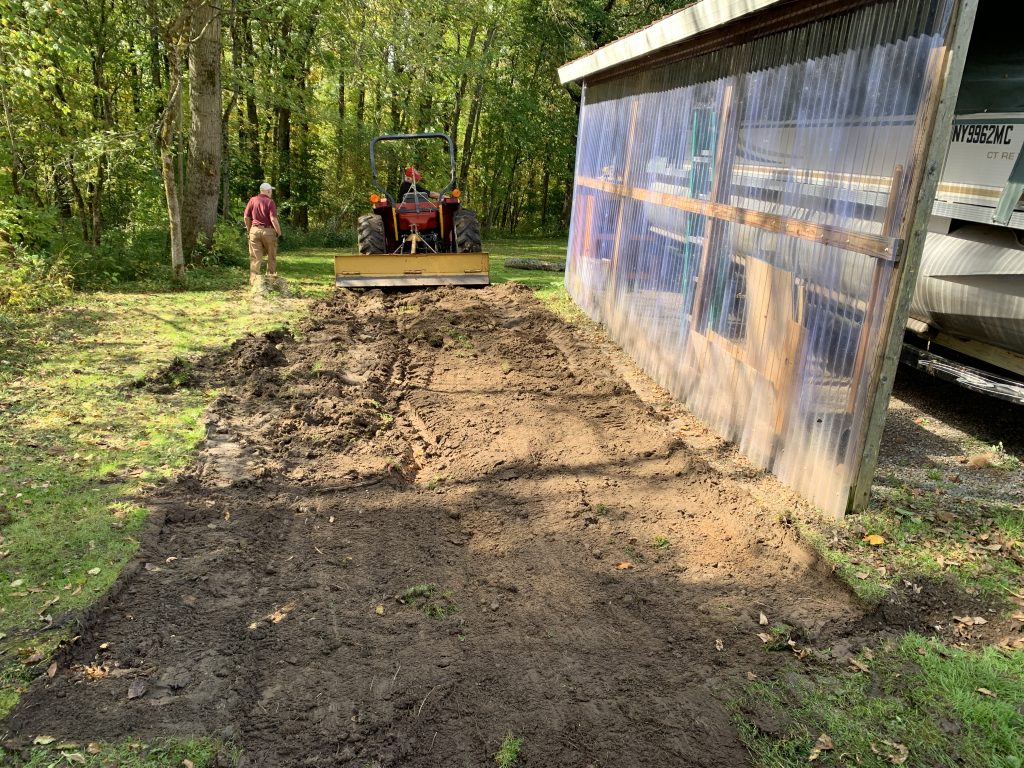
As we discussed it, we went through a few revisions. Because of the snow load, my dad wanted to have a decent pitch (or in other words, slope) on the roof. This helps the snow fall off as it builds, especially with a metal roof, which is what we planned to use. The problem with that is we didn’t have the height to make a good pitch without making the roof too low. Then my mom had a good idea: the yard was already on a bit of a slope, why not dig down to get more clearance? I balked at this, knowing my dad would want to do it by hand versus renting a skidsteer for the day at $300. She then had another good suggestion, why not ask our neighbor with a tractor for help? He ended up doing in an hour what would have taken us forever by hand, and only charged us $50. Killer deal.
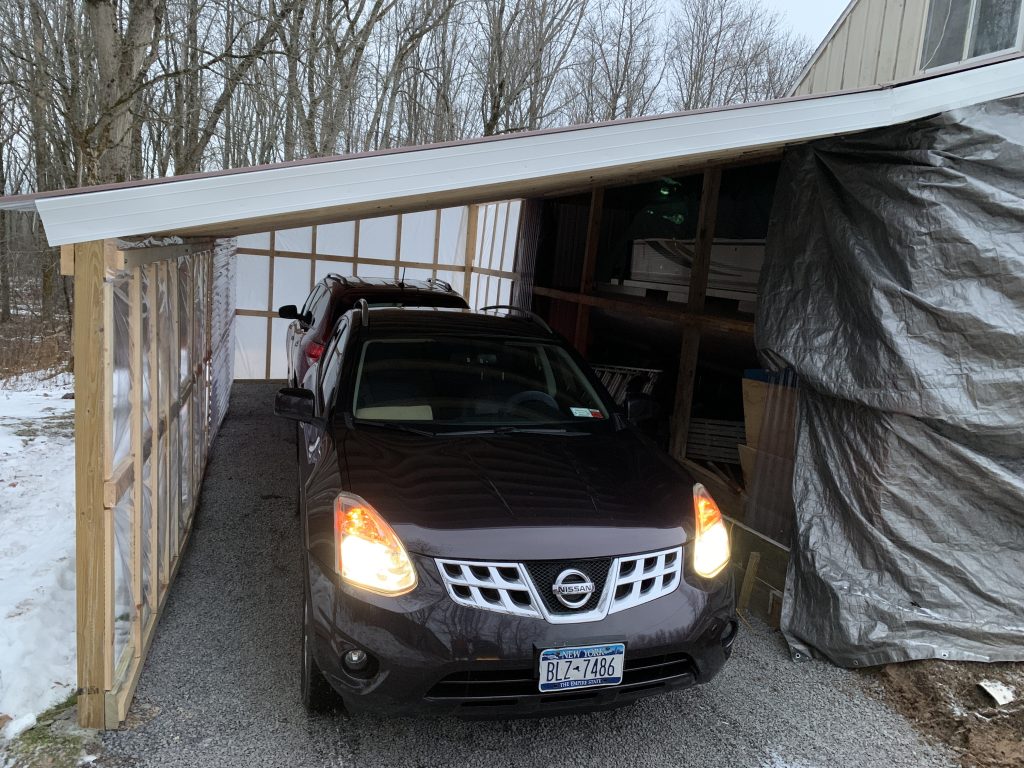
As for the length, my dad intended to match what was already there, and was about 22 feet long. I mentioned that I didn’t just want this for my car, if we were going through all the effort to build this, why not make more space? It was already close to one side of the property, so a traditional side-by-side wasn’t practical, but a longer front-to-back tandem would work. Even if we could keep his car mostly out of the weather, we’d be ahead. He was reluctant to go too big, but we compromised on 28 feet long, which would let him get about three quarters of the way in behind my 16 foot car.
Revision 2: 11 feet wide, 28 feet long, “quasi-tandem” (aka almost two cars)
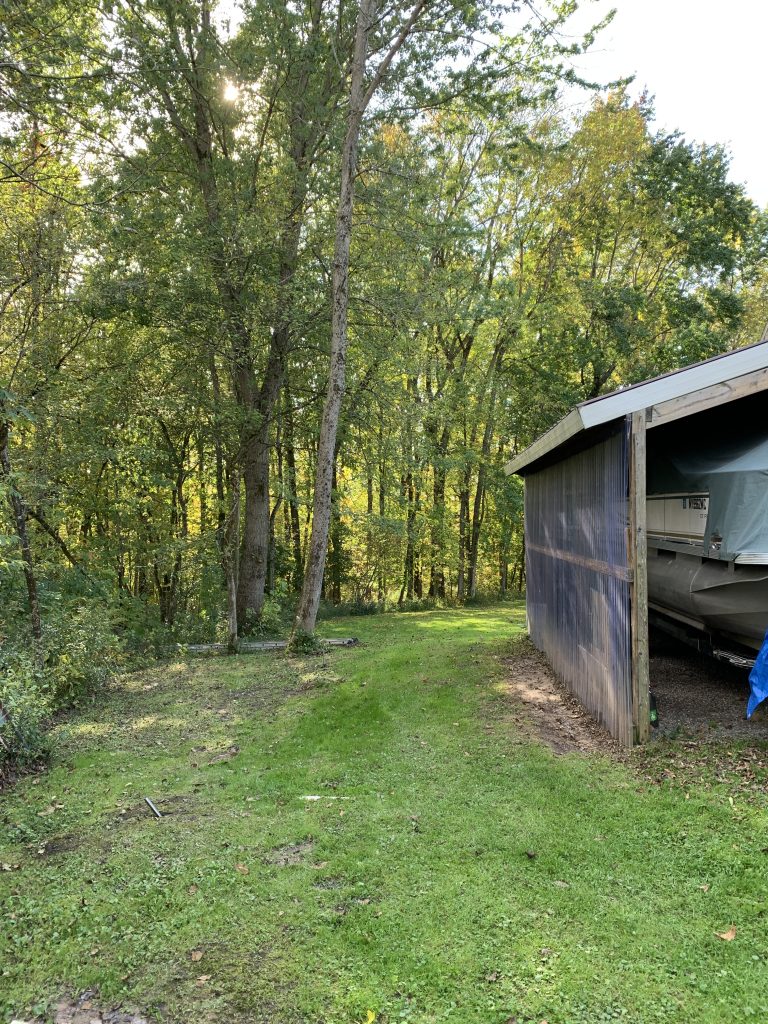
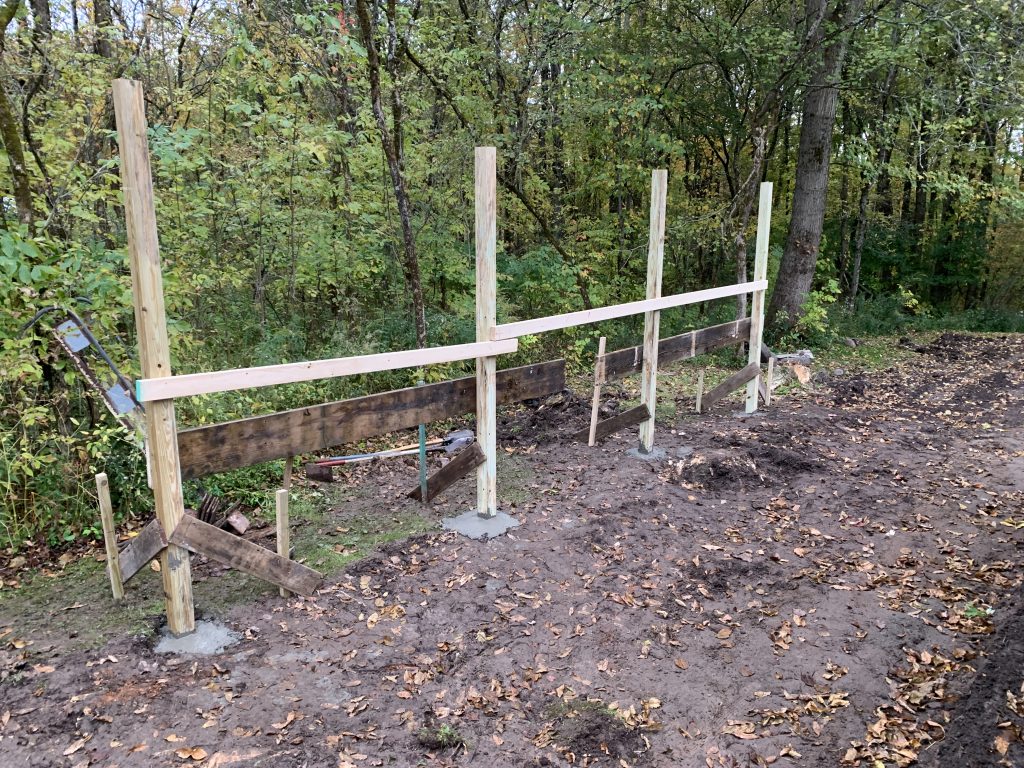
As they say, no plan survives first contact with the enemy. That was the case here. When we started digging with the tractor, we hit some really big tree roots. We were able to get most of these out with a chainsaw and shovels, but when we dug the postholes for the 4x4s, we were hitting big tree roots 12 or 16 inches down in the holes. We had to shift the first one out about another 6 inches to get a good 24″ deep hole, which increased our width. The same situation in the back forced us to go a little longer, so we ended up just about 30 feet long.
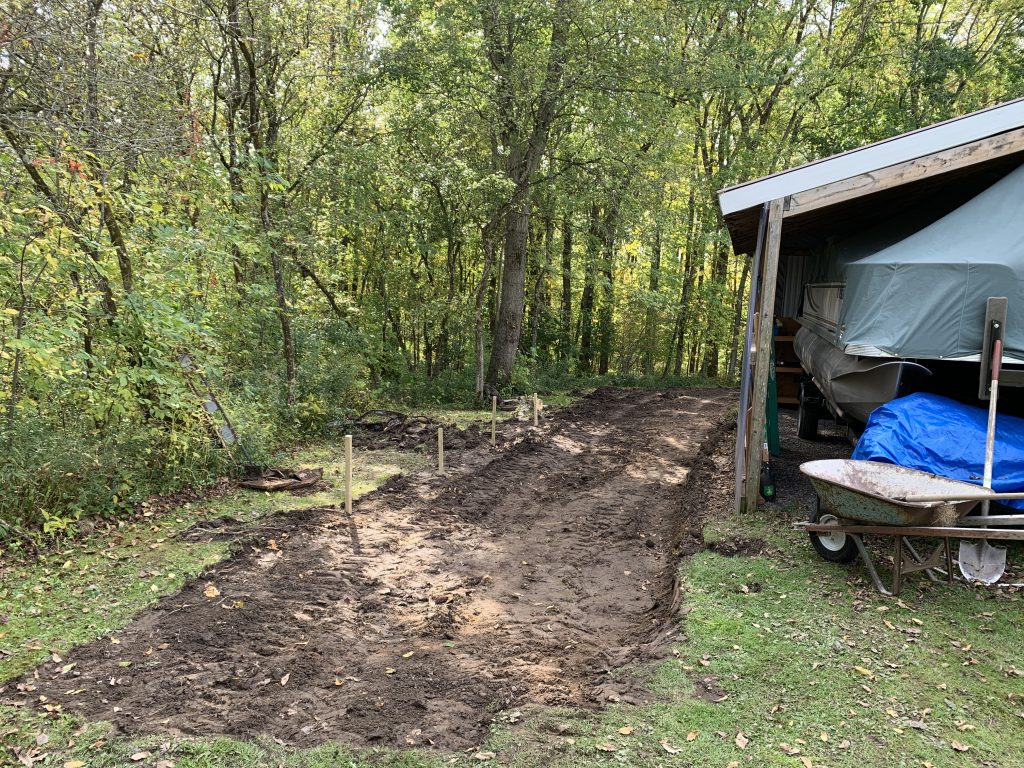
Final version: 11.5′ wide, 30′ long
Framing
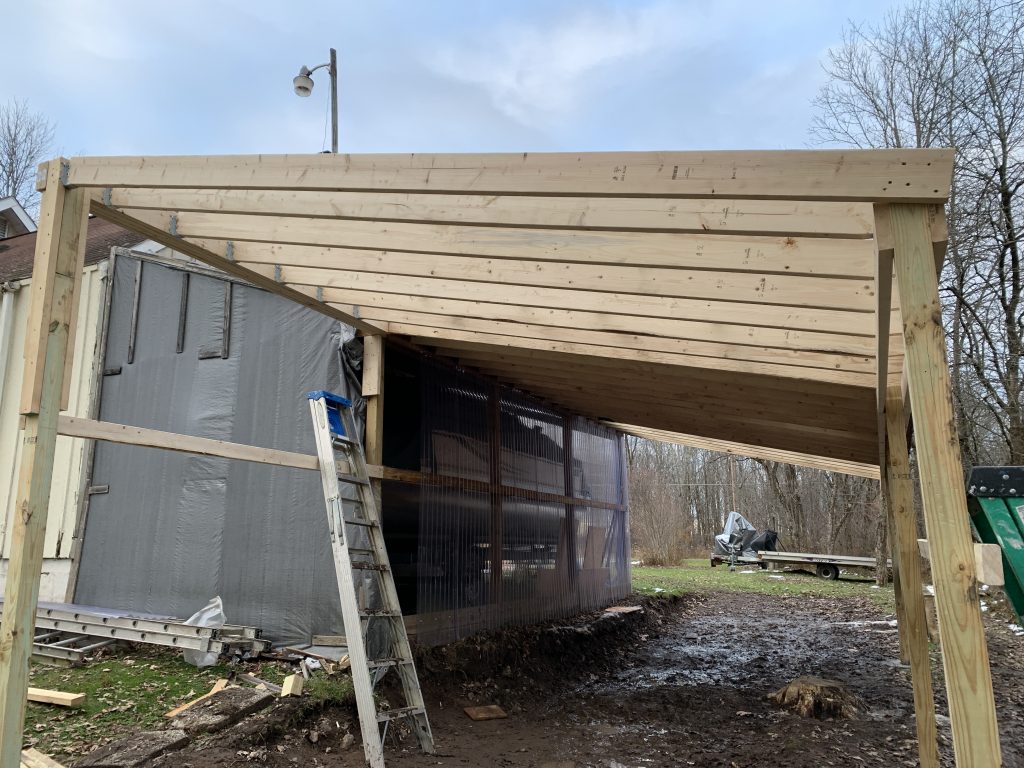
We put treated 4×4 posts every 8 feet, dug down 24″ deep and poured concrete for each. Due to the span, my dad wanted to use 2x6s for the roof, 16″ on center. We would like to have tied into the existing beam, but would have had to remove the roof to get up in there, so we lagged each new rafter into the existing with both deck screws and thick lag bolts. The lower side would be sitting on top of two 2x6s lagged into the 4×4 posts.


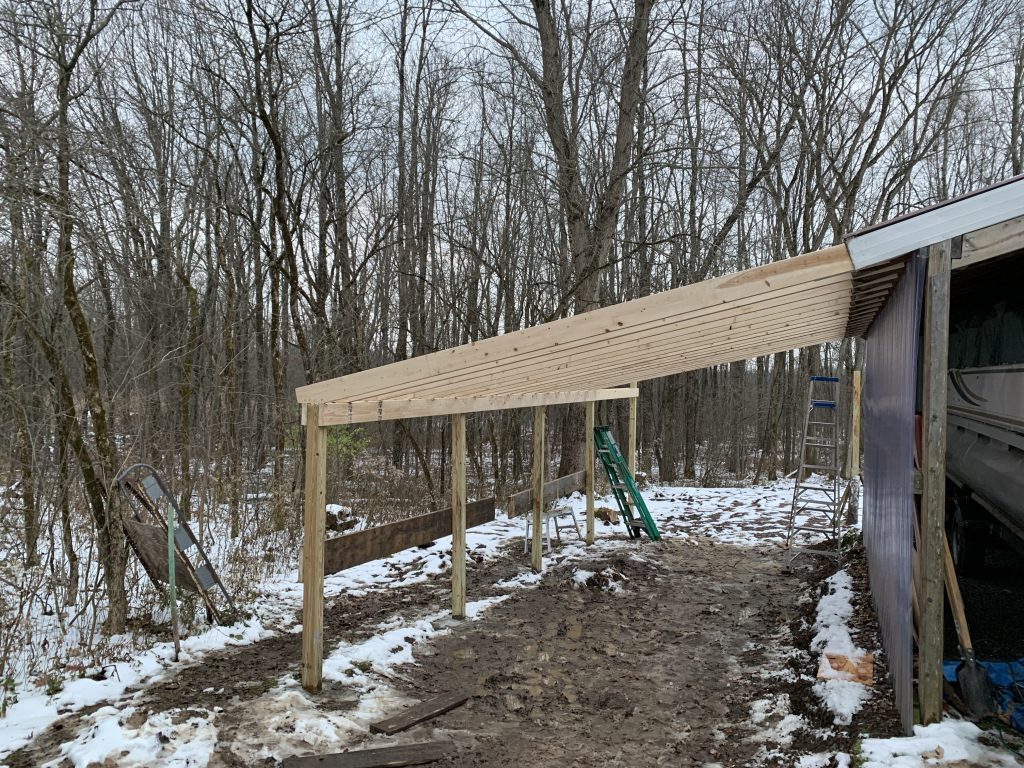
Closing in the back portion took a little longer since we didn’t have an existing building there. We extended a beam out to a 4×4, then hung the rafters with joist hangers.
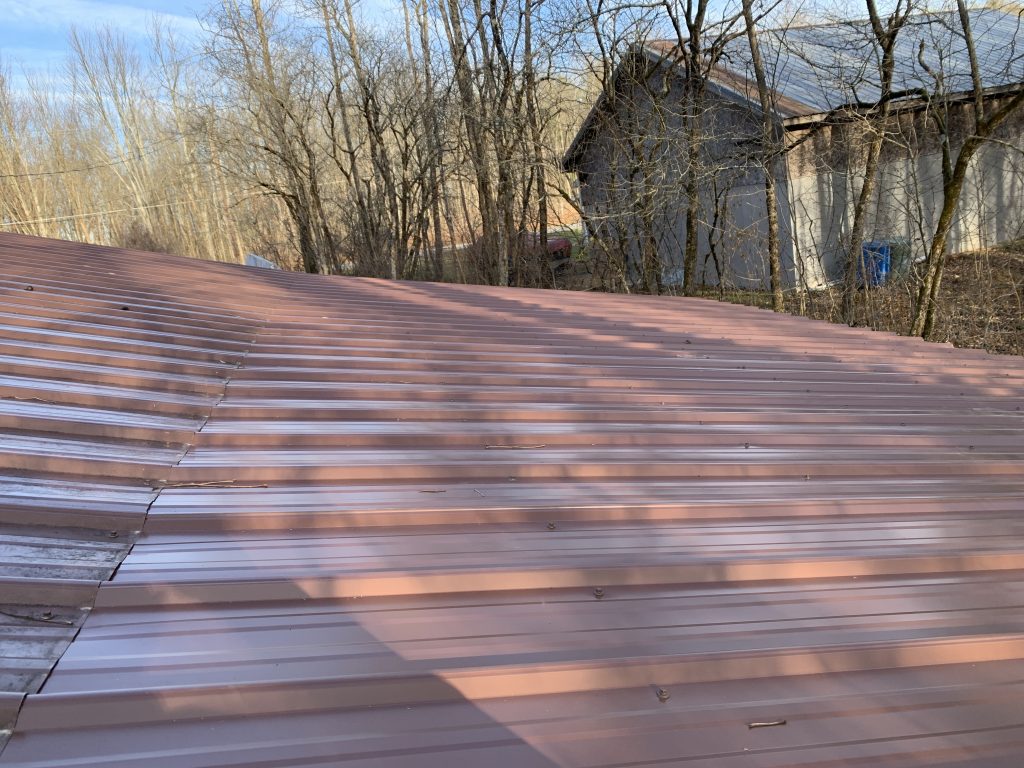
Roofing
Since we were using metal sheets for the roofing, we needed to add batten, or furring, strips (1x3s) across the rafters to screw into.
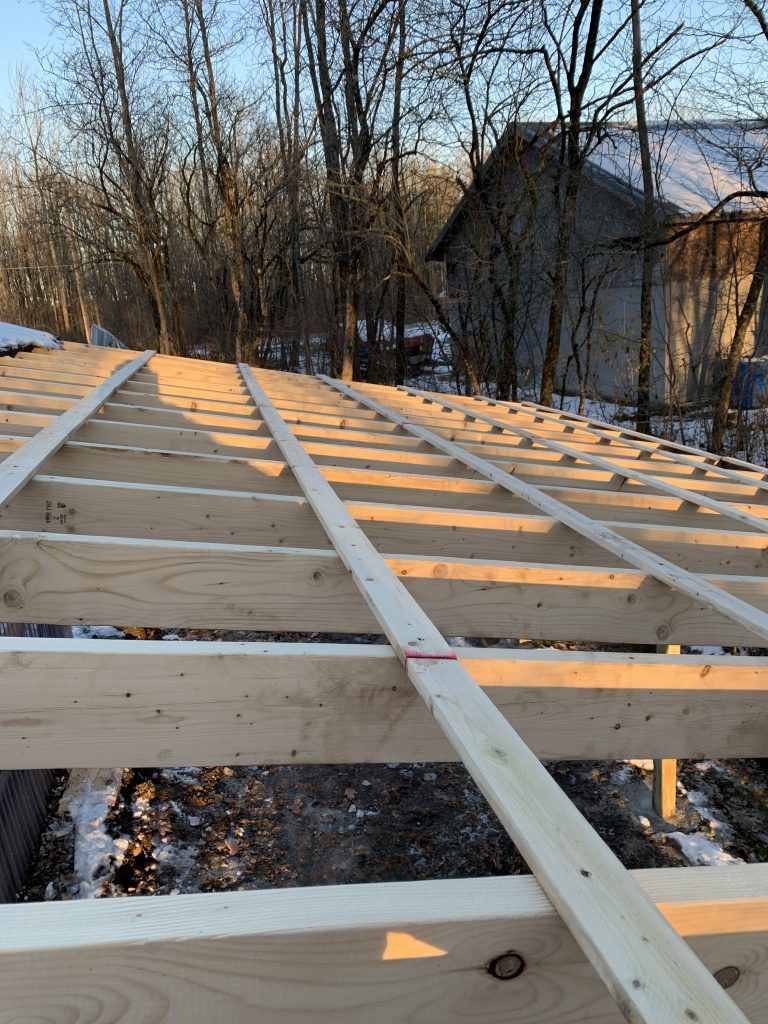
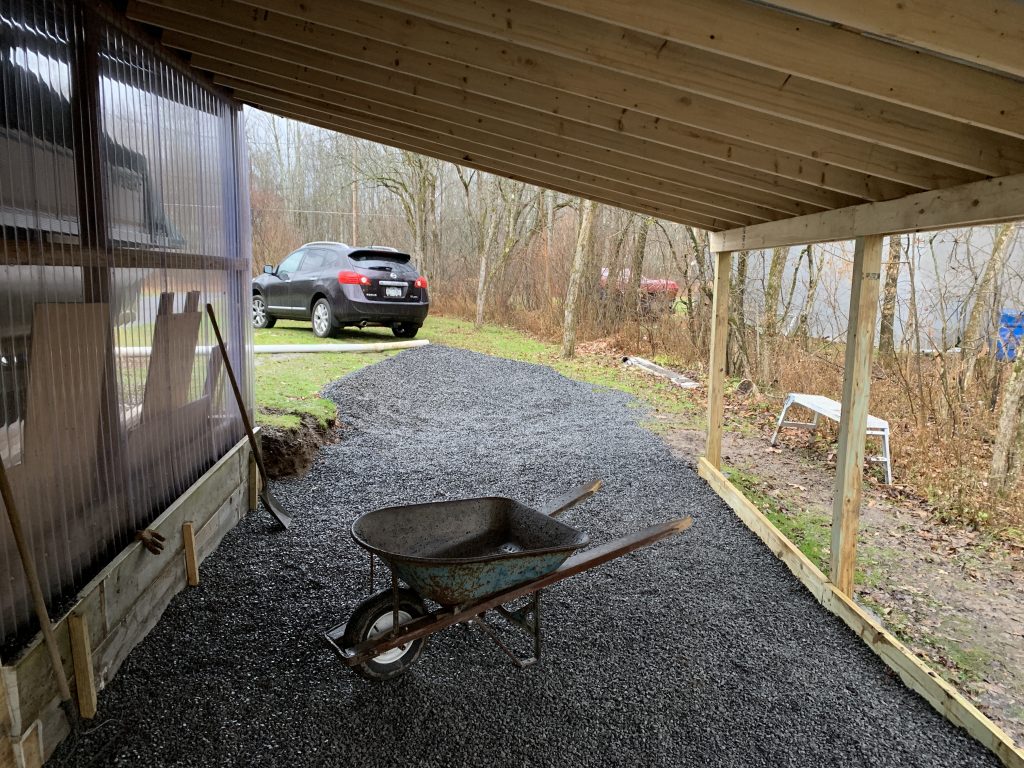
The roofing sheets are 3 feet wide, so we ordered ten 12′ long sheets to create a slight overhang.
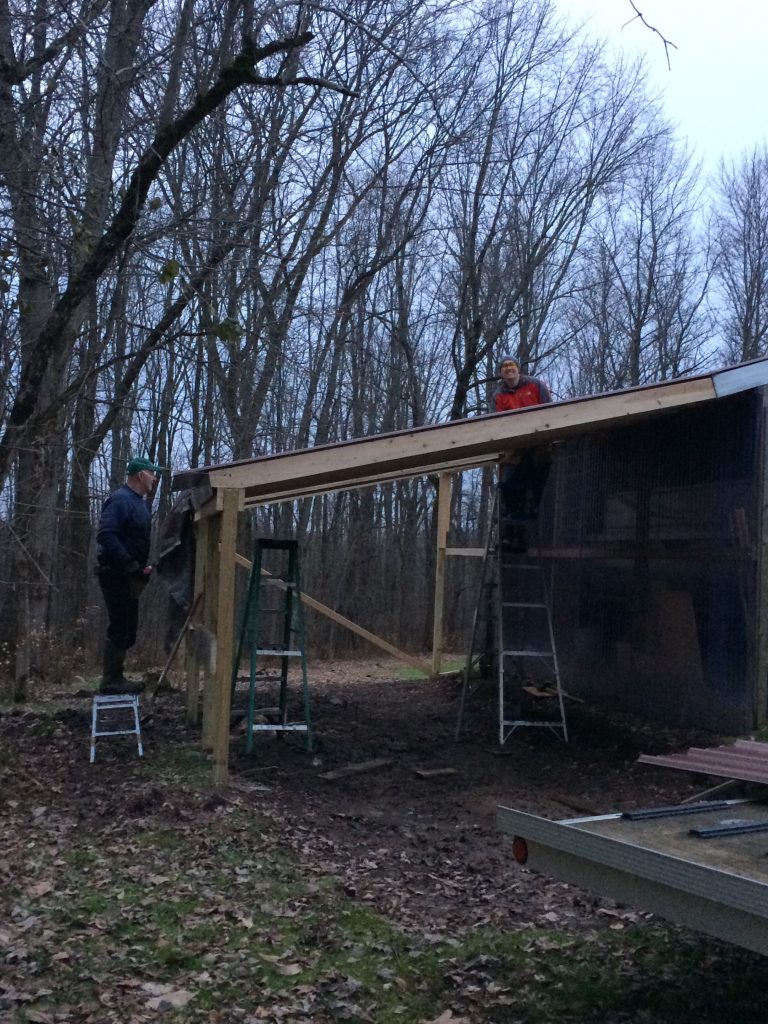
We slid the new sheets up underneath the old roof to create a continuous surface.

Flooring
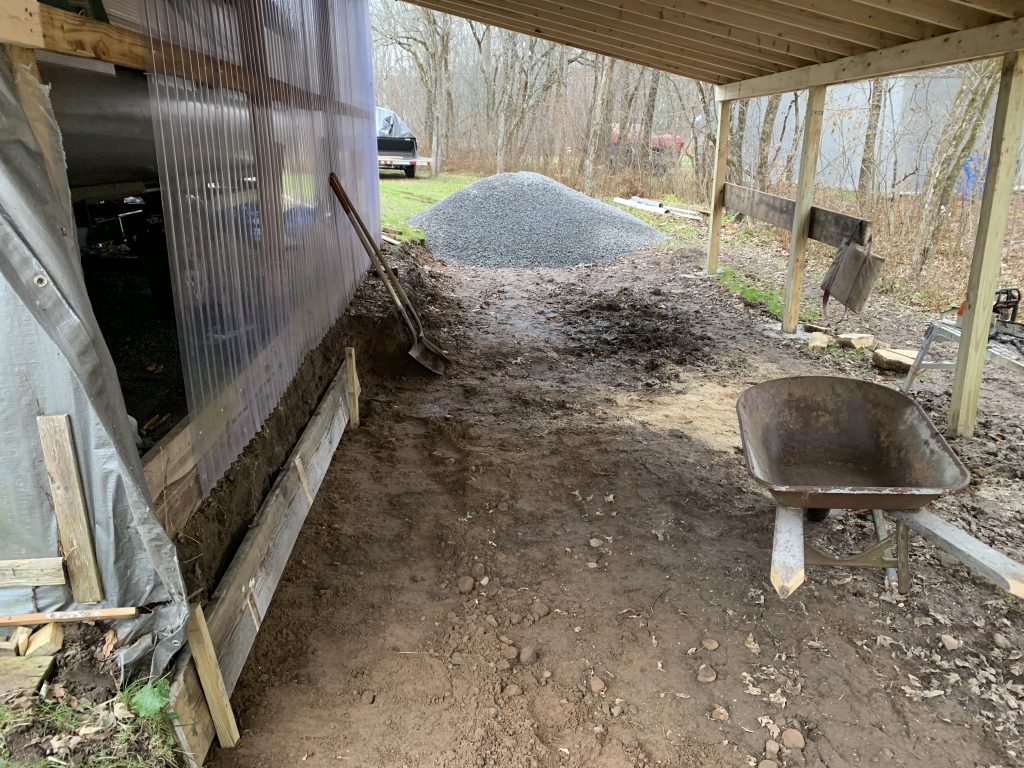
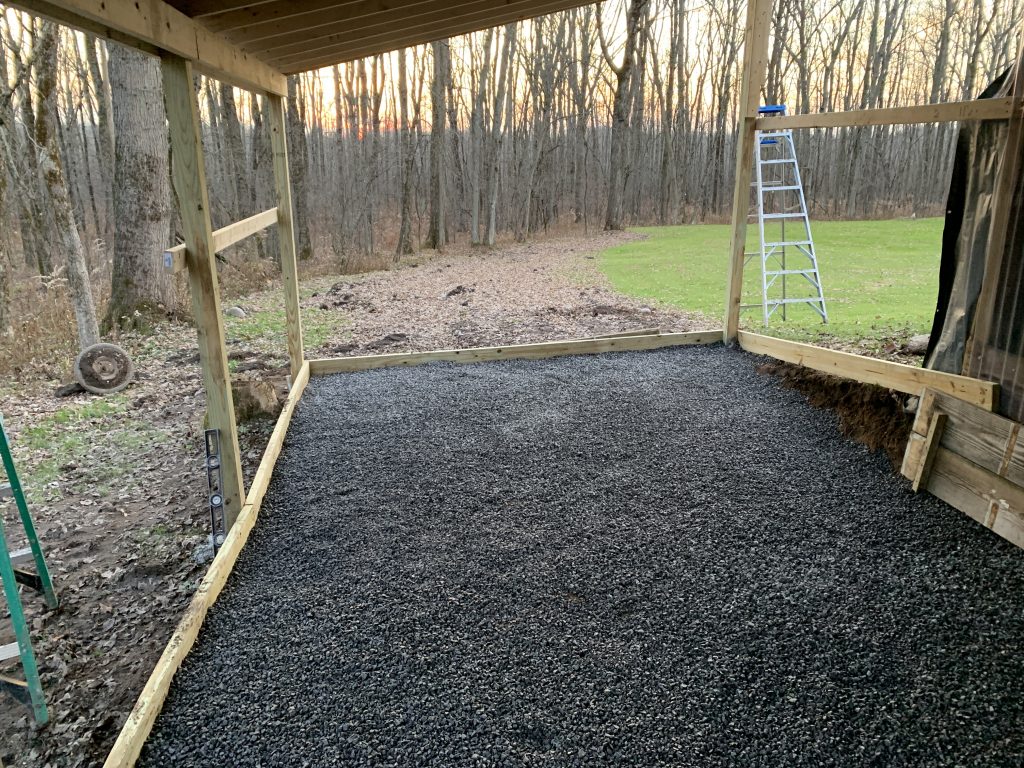
Gravel is a pretty easy solution for a cheap ground surface, but there are a lot of varieties. Pea Gravel is round and doesn’t pack. Runner crush, or driveway mix, has powder in it that helps it bind, but that’s a bad thing if it’s not exactly where you wanted it. My dad opted for what I believe was “#2 limestone”, which packs down nicely, but you can still move it around with a rake to redistribute it.
We discussed going to get the gravel ourselves, which would have involved multiple harrowing trips to the quarry with a snowmobile trailer, but thankfully opted for delivery. Some places were charging more for delivery than the gravel itself, but we again got a killer deal from a local place: $23 a ton, delivered. We got 5.3 tons for under $130.
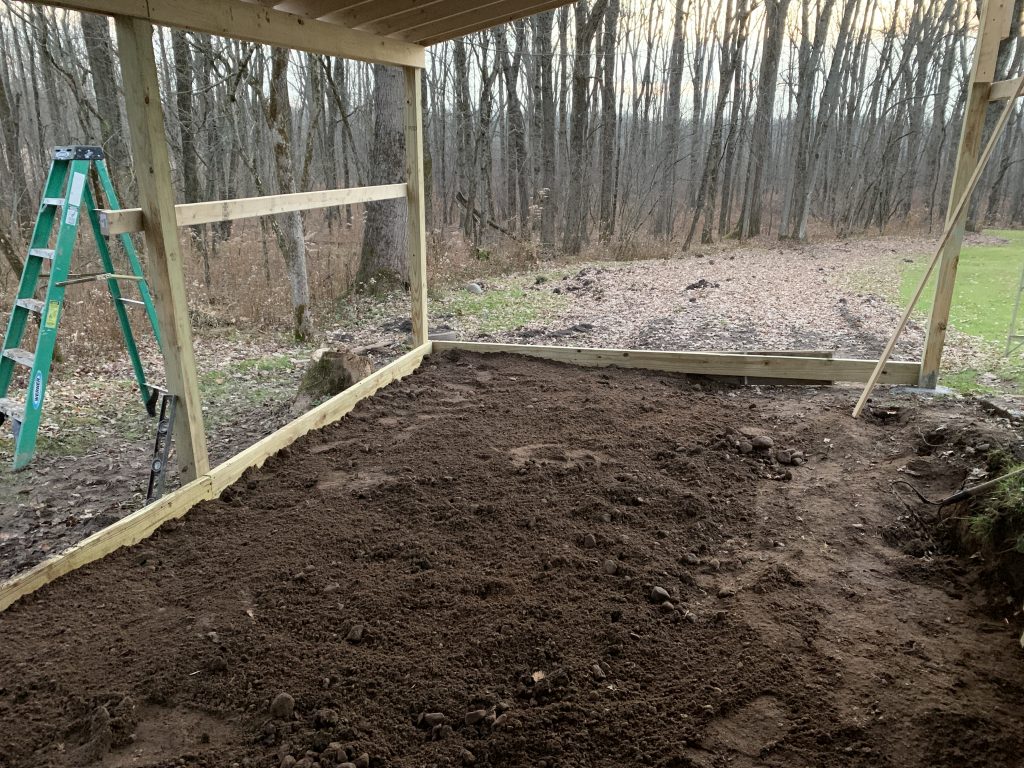
I decided to build a basic retaining wall with some leftover treated 2x10s we had, and we used the dirt to level some of the interior before spreading the gravel. We also used treated 2x6s as a ground border to contain everything.
Siding
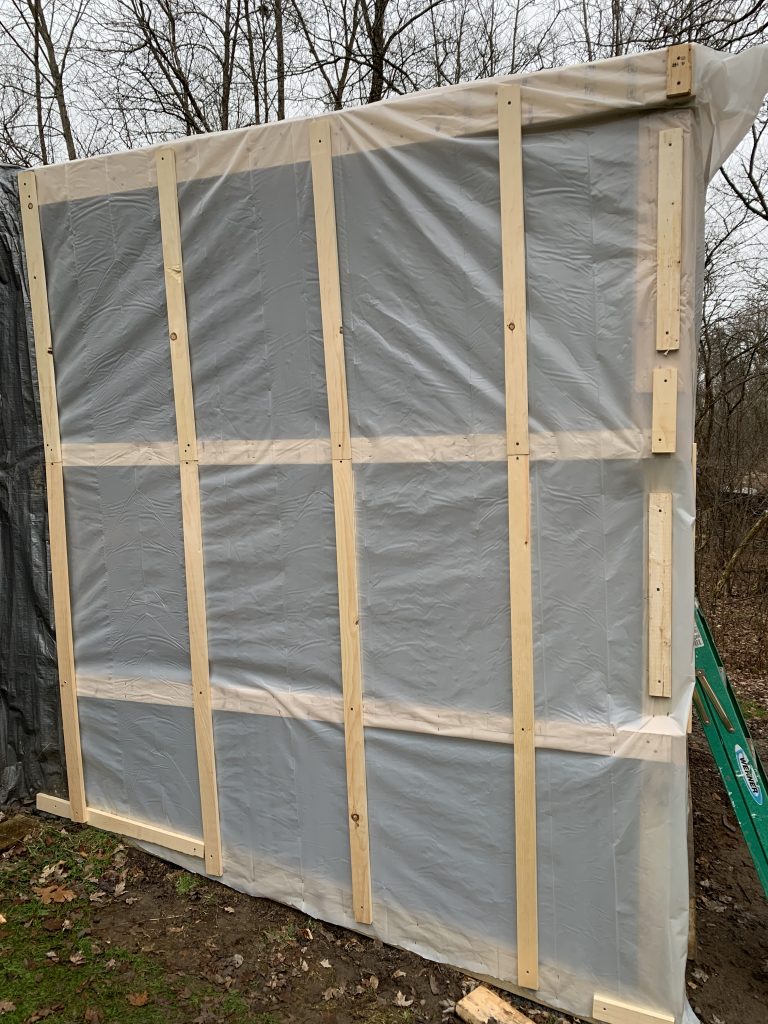
Ok, so the siding is where we went the most ghetto. It would have looked a lot better if we went with clear polycarbonate sheets, but we didn’t want to further inflate the expenses. Instead we used the heaviest plastic sheeting we could get, 6 mil, and used a lattice of batten strips with screws to strengthen it. It adds more work but saved a lot of cost. I regret not just investing the money to do the whole thing with clear sheets, it would look better and be sturdier, but this was a cheap approach to get it enclosed quickly. Ugly, but functional.
A 26″ x 8′ polycarbonate panel costs $21.98 at Home Depot at the moment. That covers 17.33 square feet at a cost of $1.27 per square foot. A 10′ x 25′ roll of 6 mil plastic sheeting is $19.88, and covers 250 square feet at a cost of $0.08 a square foot. Factoring in the extra batten strips required to do it this way, it’s still something like 1/4th the cost of rigid sheets.
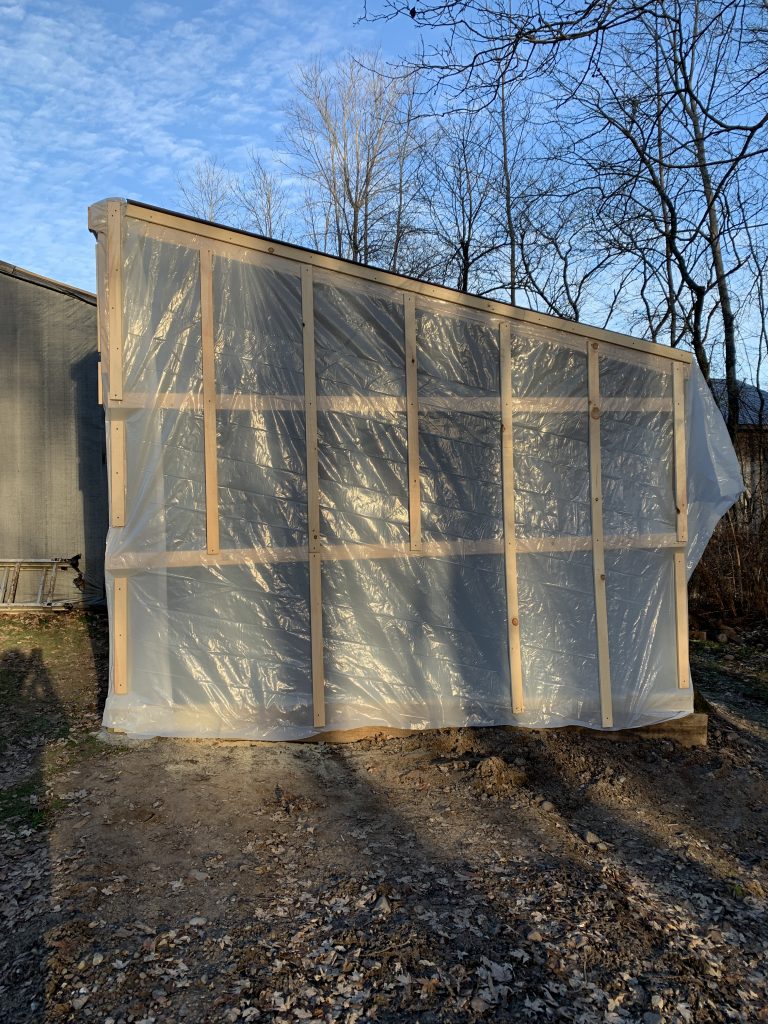
We did harvest some plastic panels from the outside wall of the old carport and moved them to the back corner. Incidentally, something I learned: PVC panels are different from, and inferior to, polycarbonate. PVC is a few bucks cheaper, which means a lot of people go for it (including what my dad had), but it’s brittle, almost impossible to cut without breaking, and “clear” is still somewhat opaque. Polycarbonate is totally clear, tougher, and can be snipped with tin snips. So if we ever do this again, we’re going polycarb.
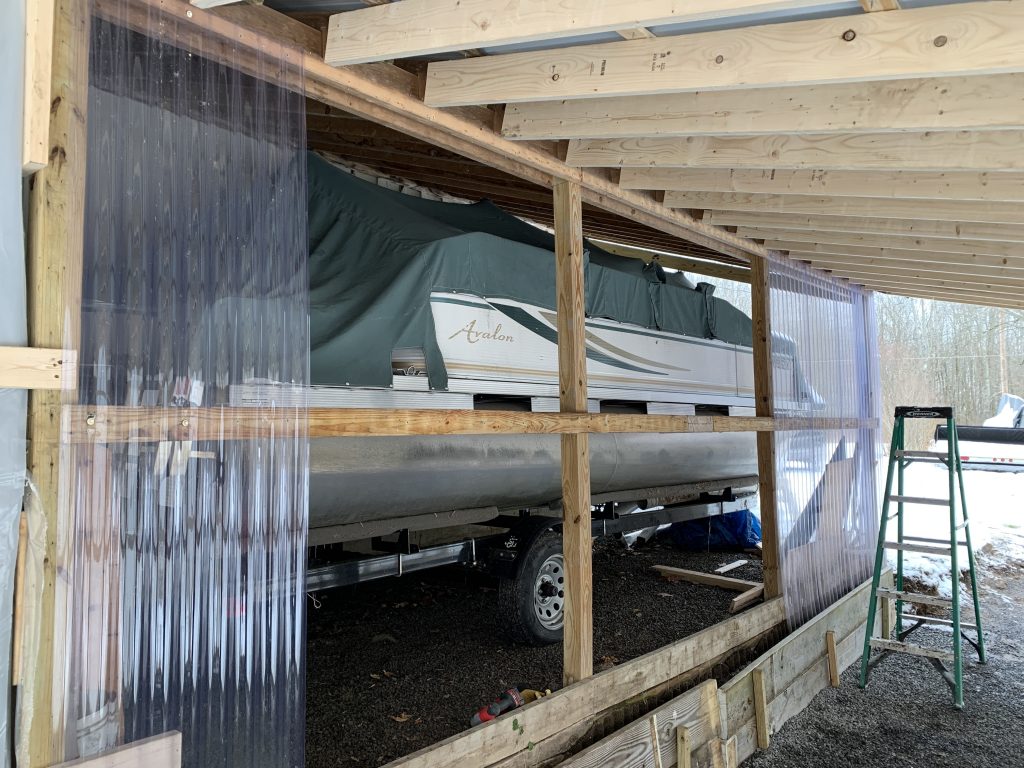

We used some clear vinyl in the front, both to be able to see through it fully and to see if it’d be a tougher material than the other sheeting. Quite the opposite – it tore incredibly easily along the vertical folded seams of the roll, though pulled horizontally it seemed tough. I’m sure we’ll end up redoing it sometime; for now, we’ll leave it until spring unless it rips in a windstorm.
Final Product
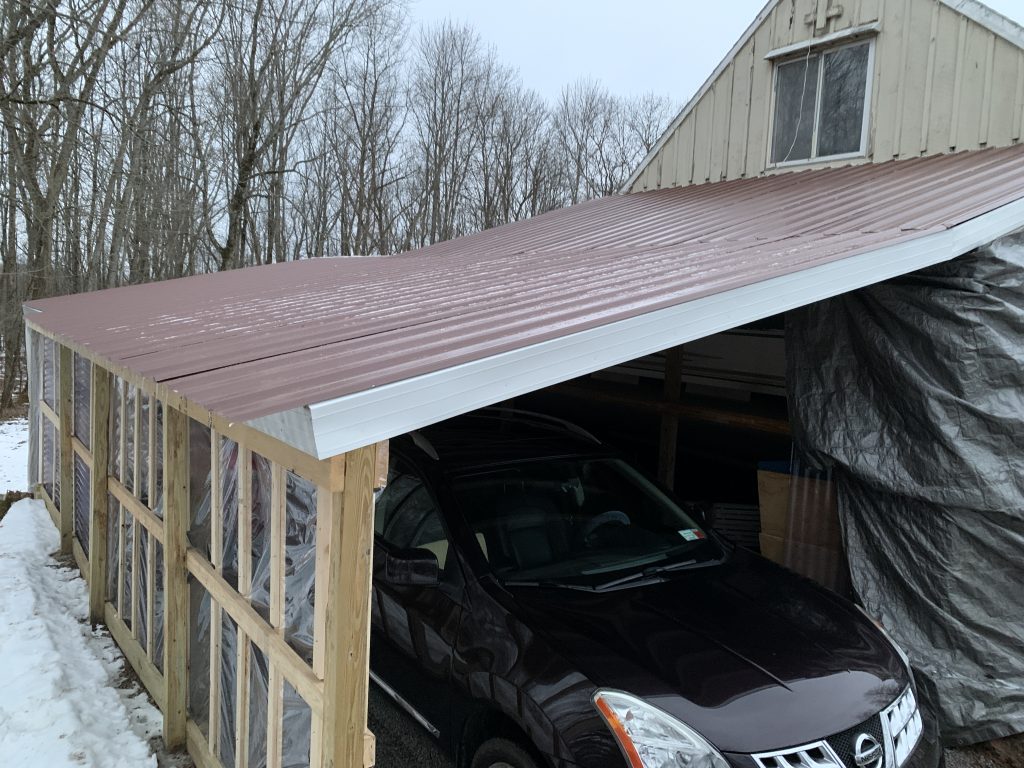
We cleared up a bunch of odds and ends, including the white aluminum fascia you see here, adding some 10″ roof flashing to wrap the exposed beam in the back, and adding another short retaining wall on the diagonal slope in the back using reclaimed treated lumber.
Now that it’s done, my dad is tremendously happy to have the extra storage space. No more digging his car out after a snowstorm! The width makes it easy to drive in and have enough room to get out, and the length is barely enough as it is, so it’s good we took that extra two feet.
Cost
I didn’t track everything precisely, since my dad insisted on footing the bill, and he made a bunch of the store runs. Here’s what I know and an estimate of the rest:
| Material | Quantity | Cost | Total |
| Roofing sheets | 10 (3’x12′) | $31 | $310 |
| Roofing screws | 1 (250 ea.) | $17 | $17 |
| Gravel | 5.3 tons | $23/ton | $122 |
| Rafters, 2x6x12 | 24 (16″ oc) | $8.50 | $204 |
| Posts, 4x4x8 | 6 | $7.88 | $47.28 |
| Beams, 2x6x12 | 9 | $8.50 | $76.50 |
| Siding: Plastic | 1 (10’x25′) | $19.88 | $19.88 |
| Siding: Vinyl | 1 (54″ x 15′) | $9.88 | $9.88 |
| Tractor work | $50 | ||
| Border, 2x6x12 | 5 | $9.17 | $45.85 |
| 4″ Lag Bolts | 10 | $0.98 | $9.80 |
| 3 1/2″ Deck Screws | 3 (1 lb boxes) | $9.47 | $28.41 |
| Furring, 1x3x8 | 60 | $1.68 | $100.80 |
| Misc. (estimated) | $75 | ||
| Total | $1,116.40 |
All told we’re pretty happy with this. I was hoping for it to cost less than $1000 in the beginning, but that was before we added another 8′ of length and a new area to build out. We were very fortunate to get such good deals on both the tractor work and the gravel delivery.
Conclusion
Thanks a lot for checking out our build. It took about two months of on and off work, and as you might be able to tell from some of the pictures, we had a lot of fun doing it. Both my dad and I like to work with our hands, and to make something like this that’s functional and adds a lot of practical value was rewarding. Feel free to hit me up with any questions or comments!
1 Comment